MCFE Home


UKC Mobile
Software
MCFE FieldNote User Manual
(Newton version)
Version 1.0 (incomplete draft)
Table of Contents
- Background
- Architecture
- Installation
- The TrackerManager Module
- Tracker Modules
- FieldNote Applications
- Appendix 1: PhotoForm.html
1 Background
More to come here
2 Architecture
The FieldNote system includes the following components:
- A TrackerManager that maintains a registry of available tracking facilities.
- Various Tracker modules to monitor external sensors. Only two GPS Trackers supporting NMEA and Trimble binary (TSIP) protocols, are included in the current release, together with a simple GPS Simulator Tracker that can provide user-entered position and time when a GPS receiver is not available.
- A NoteTrigger module that provides an optional context-aware triggering capability. Note that this module is not included in this release.
- Various FieldNote Applications that support the creation, display and editing of FieldNotes. This release includes two types of application:
- an auxiliary Tracker button for the built-in Notes application, and
- example web pages with embedded NewtonScript objects intended for use with the Newt'sCape browser.
3 Installation
Install the TrackerManager (trackman.pkg) and required Tracker (e.g. gps_tsip.pkg) modules using Newton Connection Utilities (NCU), or other package installer. The auxiliary Tracker button for Notes is installed automatically with the TrackerManager. If you are using Newt'sCape, the web pages can be copied to Notes (we normally file these in a separate folder called 'Forms'). If the Newton has a network connection, Newt'sCape can be used to load these pages from an HTTP server and then file them in Notes.
4 The TrackerManager Module
The TrackerManager is used to organise a number of trackers on a single machine. It is optional in the sense that tracker modules may work as stand-alone programs (see below), but it is a core component of the FieldNote architecture as it provides a central registry of installed components. The NoteTrigger module and FieldNote Applications use the TrackerManager to determine which Trackers are available and to initiate communication with them.

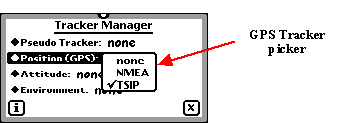
Figure 1: TrackerManager: using the GPS Tracker picker to set the default to TSIP protocol.
The manager presents a simple user interface that allows the user to select the default tracker module for each registered class of tracker (location, attitude, etc.). For example, several GPS trackers may be present, one for each of several communication protocols (NMEA, Trimble or CMC binary).
5 Tracker Modules
Tracker modules monitor external sensors. Typically, these sensors are connected to the computer via a serial, infra-red, PC card or CompactFlash card interface, and a separate tracker module is required for each type of external device. More than one tracker module may be active at any time, monitoring different aspects of the user’s environment. The main purpose of the tracker modules is to provide a common interface to contextual information across a wide range of external sensors. Trackers can be switched between a foreground (visible) and a background (invisible) mode. When invoked by a FieldNote Application, they will usually start up in the foreground, but can then be switched to operate in the background mode, supplying data to the application.
To support the foreground mode and stand-alone operation, trackers provide a user interface that displays the current state of their tracked variables and allows the user to set any operational preferences.
5.1 Pseudo Tracker
The PseudoTracker is intended to act as sources of ‘logical’ or ‘pretend’ context. Typically, there will only be one such tracker in use supplying all logical context information. Unlike the constrained sets of capabilities of most physical sensors, the possible range of this type of contextual information is essentially open-ended. For this reason, a simple generalised interface is provided.
Note: the PseudoTracker is not included in this release.
5.2 Location Trackers
There are two forms of Location Trackers:
- Location Name Tracker
- Position Co-ordinate Tracker
5.2.1 Location Name Trackers
Location Name Trackers can provide a name for the user's current location. This may, for example, be derived from an active badge system within a building, or a mobile phone, wireless or infra-red network cell-name. Alternatively, it might be implemented by table lookup in a Position Coordinate Tracker.
Note: no Location Name Trackers have been implemented for the Newton.
5.2.2 Position Co-ordinate Trackers
Position Co-ordinate Trackers are typically, but not exclusively, trackers that work with GPS receivers. Figure 2 shows the user interface of a typical GPS Tracker as it appears before establishing a connection with the GPS receiver.
![]()
Figure 2: GPS Tracker before receipt of data from receiver.
Figure 3 shows the interface in normal operation. The main part of the display shows information collected from the GPS receiver. The size of the display and the amount of information shown can be adjusted via the preferences slip (see below). At the bottom of the display is a control bar with control buttons and status displays.
![]()
Figure 3: GPS Tracker, showing all elements of the user-interface.
From left to right the controls are as follows:
- Time and battery button: briefly displays the current dat, time and battery charge state when pressed.
- Prefs button: presents a popup menu with About and Prefs options. About displays version and copyright information; click on the information panel to close. Prefs leads to the preference slip used to set various operating parameters (see below).
- Status message: this area displays the current state of the connection with the GPS receiver. Possible messages are Clock set, Disconnected, Connecting, Connected, Disconnecting, and I/O Buffer Error. In normal operation, either Disconnected or Connected will be shown. I/O errors happen from time to time and should be automatically corrected.
- Go/Stop button: used to start and stop communication with the GPS receiver. When stopped (Disconnected), the button label shows Go. When running (Connected), the label is initially Stop, but this changes to a 'rotating' activity indicator when messages from the receiver are decoded. Other labels may appear briefly in intermediate states.
- Hide button: this button has a star-shaped icon corresponding to the Newton's "Notify Icon". When pressed the tracker display is hidden and the tracker continues to run as a background process. The display can be brought back to the foreground by choosing the GPS Tracker entry from the Notify Icon menu. (The Notify Icon is a star-shaped symbol that appears at the top centre of the screen as a reminder of background/invisible processes. When this icon is tapped, a popup menu listing background processes is displayed.
- Close button: disconnects from the GPS receiver and terminates the tracker.
Setting preferences
Figure 4 shows the preference slip for the TSIP protocol tracker. Some of the options shown may not be available for other GPS trackers. The main distinction here is between the NMEA tracker and those designed for use with binary protocol receivers. Although many receivers can produce NMEA output, the NMEA Tracker is intended primarily for use with simple hand-held receivers such as the Garmin GPS-45, GPS-12 or GPS-II+. The NMEA tracker options (Figure 5) deal only with input from these devices. Datum settings, for example, should be configured using the receiver's own user-interface.
![]()
Figure 4: GPS Tracker preferences slip (TSIP binary protocol).
![]()
Figure 5: GPS Tracker preferences slip (NMEA protocol).
Binary protocol receivers such as the Trimble SveeSix and SK-8, or Canadian
Marconi Allstar, can both output raw measurements and can be configured by the
tracker. The additional tracker options cover receiver configuration. In the following
descriptions, options in italics are normally available only on binary protocol trackers.
Coordinates: Trackers can display the latitude & longitude or ECEF XYZ
coordinates supplied by the GPS receiver, or convert them to UTM or British National
Grid. The resulting display formats are shown in Figure 6.
Note that ECEF coordinates not supported by the NMEA protocol Tracker.
|
UTM |
OSGB |
|
Lat/Long |
ECEF XYZ |
Figure 6: GPS Tracker; the different coordinate formats.
- Datum: If the GPS receiver supports datum setting, the following are available; WGS-84, European 1979, European 1950 (mean and UK), OSGB 1936 and Ireland 1965.
- Alt. model: If the GPS receiver supports a choice between HAE (height above elipsoid) and MSL (mean sea level model).
- Fix interval: The interval between Tracker display updates can be set to 1, 2, 5, 10, 30 or 60 seconds. Intervals less than 5 seconds are not recommended when using a MessagePad 130 with a binary protocol GPS receiver.
- Double-precision fixes (TSIP Tracker only): Trimble SveeSix and SK-8 receivers have an option to choose between single (32 bit) and double (64 bit) precision coordinate output. Single precision is supported only to reduce the load when using a MessagePad 130.
- Almanac, Ephemeris, etc: Enable receiver output of satellite almanac, ephemeris and clock parameters, together with the broadcast almanac health data and ionosphere model.
- Raw Data: Enable receiver output of raw pseudorange or integrated carrier phase measurements.
- GPS connect: Select whether the GPS receiver is attached to the Newton via the serial port, infra-red, or PCMCIA card interfaces.
- Time display: Choose between UTC, Local time, the Newton's internal clock, or GPS time.
- Clock setting interval: The Newton internal clock can be set from the GPS timing data. This option determines the interval at which the internal clock is adjusted; choices are never, 10min, 30min, 1hr, 6hr, 12hr or 24hr. Note that if this option is set to anything other than "never", the clock will be set at the first whole minute after a good time fix is available, and then subsequently at the specified time intervals. For example, if the interval is 30 minutes, the clock will be set as soon as possible and then subsequently at the half and whole hours.
- Velocity: Choose between display of velocity data as ground speed in meters/second, kilometers/hour or miles/hour, or as East/North/Up or ECEF X/Y/Z velocities. The range of choices may be limited by the GPS receiver's capabilities.
- Time, DOP, SVs and Velocity check boxes: When each is checked, the corresponding information appears on the tracker display. The default setting is to show DOP figures and the list of satellites used in the fix. The Tracker display resizes to suit the selected output. For example, Figure 7 shows the minimum display containing only position information. This results from deselecting all four of these check boxes.
![]()
Figure 7: GPS Tracker with Time, DOP, SVs and Velocity output turned off.
Operation
Once suitable preferences have set, the GPS tracker can be used in stand-alone mode.
- Connect the GPS receiver to the Newton and ensure that the receiver is switched on.
- Press the Tracker Go button. The button label changes to Stop and the status display changes to Connected. When data is received and decoded by the tracker, the button label is replaced by the rotating activity indicator and data appears on the screen.
- Press the button again to stop the tracker.
Whether connected or not, the display can be hidden using the Hide button and subsequently restored using the Newton "Notify Icon" at the top centre of the screen (Figure 8).
![]()
Figure 8: Tapping on the Notify Icon produces a popup menu of hidden processes. In this case, tapping on "GPS Tracker" will bring the tracker into the foreground.
Preferences may be changed whilst the tracker is connected. When the preference slip is closed, the display is reset to its initial state until new data arrives from the GPS receiver.
For use with other applications such as the built-in Notes and with web browsers such as Newt'sCape, see later sections.
GPS Simulator Tracker
The GPS Simulator Tracker is a simple tool that can be used in place of a GPS tracker to provide position and time data to other programs such as those described below.
Figure 9 shows the user interface of the Simulator, and Figure 10 shows its associated preferences slip.
Figure 9: GPS Simulator Tracker
Figure 10: GPS Tracker preferences slip (Simulator).
5.3 Attitude Trackers
Attitude Trackers monitor azimuth and elevation angles supplied by external sensors. Typically the sensor would be either attached to the computer, or head mounted and the returned values would be used to indicate the user’s direction of view. By adding a range measurement function, such trackers could also function with laser range- finders or similar equipment as a means of recording the location of distant objects relative to that of the user.
Note: no Attitude Trackers have been implemented for the Newton.
5.4 Environment Trackers
Environment Trackers are intended to monitor a range of sensors providing information about the current atmospheric conditions in the immediate vicinity of the user or computer. Typical sensors would measure variables such as temperature, humidity, wind speed, ambient light level, etc.
Note: no Environment Trackers have been implemented for the Newton.
6 FieldNote Applications
We describe the programs that use the services provided by Tracker, TrackerManager and NoteTrigger modules as FieldNote applications. Typically these are purpose- written programs such as the mapping and note creation module, FieldMap, described below. However, the interpreted NewtonScript environment and semi-open nature of much of the built-in software of this machine have also enabled us to provide interesting extensions to the built-in Notes program. NewtonScript functions can also be embedded in HTML and interpreted by the Newt'sCape web browser.
6.1 Tracker Button
In common with many PDAs, the Newton offers simple notepad and diary programs. In both cases it is possible to extend the user interface of these programs by adding buttons or menu items, and this has been widely used as a means of adding functionality. For example, several available web browsers add an 'Open in Browser' option to the Notepad, thus enabling users to edit their HTML source with this built-in editor and switch to the browser to view the results. In our case, we have added options to insert data from our Tracker modules into notes entries. When the TrackerManager has been installed, the Tracker Button appears in the button bar of the Notes application:
![]()
Clicking on the Tracker button produces a popup menu that gives access to the TrackerManager or to the different types of data available from installed Trackers. If the TrackerManager is not installed, an apropriate error message is displayed and no menu appears. If the TrackerManager is present, but no Trackers have been selected, only the Trackers option is presented. Tapping on this will invoke the TrackerManager dialog.
![]()
Here, a GPS Tracker is available. Two options are presented; Position is available with all location trackers, but GPS data only appears when the the Tracker can provide raw pseudorange or carrier phase output. Additional options appear if Pseudo, Attitude or Environment Trackers are installed and have been selected in TrackerManager.
![]()
Figure 11: Notes with Tracker Button - the tracker is displayed and the captured data written to the note at the current caret position.
To use these options to insert position or raw GPS data into a note:
- Open a new note and tap at the point where the data should be inserted. Ensure that the "caret" (a ^ symbol indicating the current text insertion point) appears.
- Tap on either Position or GPS data in the Tracker button popup menu.
- If the Tracker is not already running, it is opened and connected automatically, and the program will wait for up to 30 seconds for data to arrive. If the receiver has not achieved a fix in this time, simply tap the tracker button popup menu again.
- When data is available, it is inserted into the note (Figure 11).
The Tracker may now be stopped, hidden or closed using its own interface buttons. With the Tracker out of the way, the Notes display appears as in Figure 12. Notice the Notify Icon at the top of the screen.
![]()
Figure 12: With the tracker hidden, the full note is visible. Notice the Notify Icon at top centre.
The information inserted into the note depends on the capabilities of the Tracker. This example uses the TSIP Tracker (Trimble binary protocol)
Notes:
- MessagePad 2000 or 2100: the recommended mode of operation is to leave the tracker connected whilst running in the background. Tracker data is then always available via the Tracker Button.
- MessagePad 130: the communication with the GPS receiver consumes a high proportion of the processor capabilities, particularly in the case of binary protocol trackers. There is also a problem with the caret disappearing when the tracker is first opened on top of the Notes display. For these reasons, we recommend this procedure:
- Use the Tracker Button initially to open the Tracker. Text insertion will fail at this first attempt.
- Wait for the tracker to display valid data, then tap the Hide button to place it in the backgound.
- Now, place the caret at the required point in the note and insert data using the Tracker Button.
- If the load of the running tracker is too high for other operations (e.g. hand writing or typing notes), use the Notify Icon to bring the tracker into the foreground, then press the Stop button followed by the Hide button.
- Subsequent use of the Tracker Button will restart the tracker to collect data, and it will be necessary to stop it again after each use.
6.2 Newt'sCape Forms
Newt'sCape, a shareware web browser developed by Steve Weyer offers a Newton based alternative to JavaScript and other more conventional methods of embedding functionality in web pages. This release includes an example HTML form with embedded NewtonScript objects that can be used together with our trackers and TrackerManager for data collection.
The PhotoForm includes a number of input elements derived in whole or in part from examples provided with Newt'sCape. Additionally we have provided a similar function to that offered by the Tracker Button in the Notes application (see above). The form itself is stored as a note. When Newt'sCape is installed, a "Newt'sCape Open" option is added to the Notes routing button, and this can be used to open the web page in the browser.

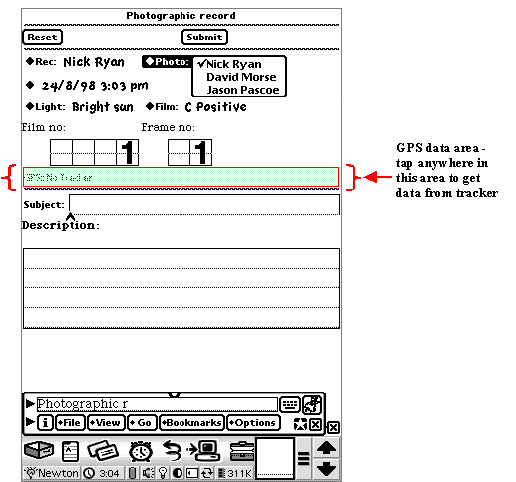
Figure 13: NewtsCape Photographic Record form with active GPS data area.
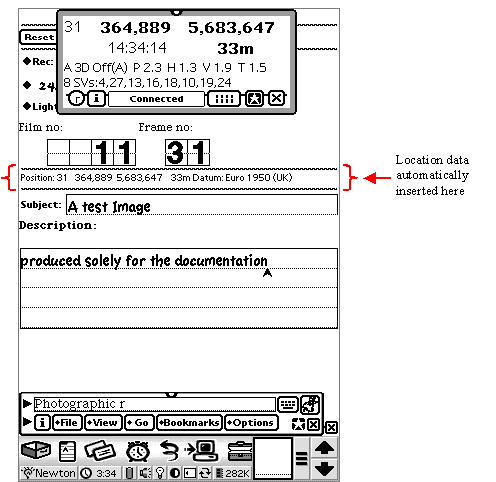
The resulting form is shown in Figure 13. If the Tracker is running when the form opens, position data is inserted automatically in the GPS data area. Otherwise, tapping in this area can retrieve the data. As with the Tracker Button, the tracker is opened if it is not already running (Figure 14).

Figure 14: NewtsCape Photographic Record form after tapping on active GPS data area.
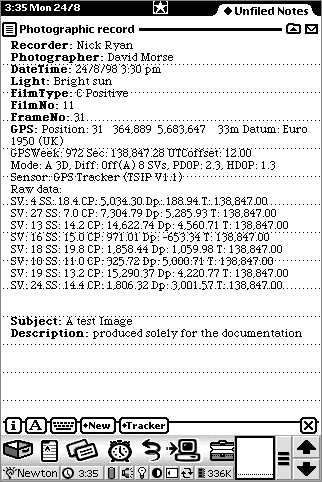
Pressing the form's submit button posts the form content to the "Unfiled Notes" folder of the built-in Note program. Here it is stored as a collection of Name: value pairs as shown in Figure 15.

Figure 15: NewtsCape Photographic Record form output "posted" to Notes.
6.3 FieldMap
The FieldMap application is not included in this release
|
|
MCFE Home |
|
Software |
|
Created by Jason Pascoe and Nick Ryan Copyright © 1996-1998 |
Email: J.Pascoe@ukc.ac.uk Email: N.S.Ryan@ukc.ac.uk Last Updated: 2nd October 1998 |